Thursday, August 31, 2006

getting closer

i made some nice headway last night. i was hoping to get both sides of drums all buttoned up but that didn't happen. i ended up checking the bearings, repacking (not using the new ones i bought) and then i got the passenger side all buttoned up. i would have had the driver's side done but i broke the little clip that the parking brake lever uses to attach to the shoe, so i need to pick up one of those today and i'll be done with the drums.

i do realize now why people don't like working on drums. the springs were a pain to get on and get everything lined up. discs are so much better. but i was able to get them on and at least they aren't complicated.


here's the new guts of the passenger side. new wheel cylinders, shoes and springs.


here's the nice shiny new drum. all this side needs is the new brake line bent and attached.

Wednesday, August 30, 2006

rust is a worthy opponent

last night i decided to go out while it had stopped raining and at least try to get my new starter installed. first off, the starter is so hard to get to, it must have been one of the first things on the car when they built it. my service manual should have told me to remove the body in order to get to it. anyway, i unhooked the two wires making certain that i knew where they went on the new starter. i got the upper mounting bolt nut off (that's in the engine compartment behind the fan!) and then went to work on the lower nut. it's encased in rust and after several application of liquid wrench, it's still on the car. it's so tight in there, that i couldn't get a ratchet on the bolt and had to resort to a wrench. and there's barely room for that. so i soaked it again and left it.

after that disappointment, i decided to try and get the old master cylinder off and get that area ready for the new one. after looking around, i decided to just leave the old one on for now and not even mess with it. the steel brake lines seriously look soldered on. they are extremely tight and i know that i'd just end up having to replace all the lines. this is another item that is just awful to get to. i could barely get my flared wrench in there to try and get the lines off and then i had no room to break them loose. ugh.

at this point, i just packed up and went inside. the cloud of mosquitoes was laughing at me but i didn't care. today i'll pick up new rear bearings and gaskets and another steel line in order to get the brakes done tonight. then i'll just have the starter and some engine work to do.

Sunday, August 27, 2006

getting there

i'll go ahead and do two posts in one today. it was like a blast furnace outside, so i didn't work at all today. but, i got some good work done on friday night and saturday.

as for friday, i got home a little early from work and immediately went outside. packed the passenger side bearings, slipped the rotor on, adjusted the endplay, slapped on the caliper and voila! passenger side done. the interesting thing is that i had no pad rubbing issues like on the driver's side. about an hour later, my friend paul and his family came over. the kids played with each other inside and he and i got down to the business of breaking the rear axle nuts. he'd brought a huge 3/4" ratchet with a matco 1/2" adaptor and a big pipe. we sprayed some more penetrating oil on (he brought some special stuff from his shop) and went to work. well, the only thing paul ended up doing was literally just picking up the car and turning the wheels. he was shocked. so he gave it one final shot and we hear a big pop! we thought he'd loosened the nut, but he'd actually busted the matco adaptor! sheared it right off. so we laughed and headed over to his shop. after rummaging around, he found a snap-on adaptor and socket (probably $100+ right there) and we headed back. this time, i sat on the back end to try and keep that down. we put the chocks in place and he went to work. bang! we both looked at each other not knowing if we'd broken the snap-on stuff or actually gotten the nut loose. fortunately, it was the nut. so one side down. went over to the other and bang! second nut done. it's amazing how the right tools really do work. i know that snap-on stuff is terribly expensive but it does work.

saturday was a nice day. i ended up fixing the driver's side caliper clearance issue by putting another washer on the caliper screws. now there is just enough clearance between the pad and the rotor so they don't rub. i checked the rotor out and it's on there properly and the end-play looks good. so hopefully this will be a good fix. i then jacked up the back of the car and got to work tearing down the rear drums. it really wasn't that bad of a job, just really messy. the side that had the leaky wheel cylinder was especially nasty. many years of brake dust coupled with brake fluid made for a black sludge that coated everything. but i got it all off without a problem, all the way down to the backing plate. i didn't buy new bearings for the rear, but i think i'm going to go ahead and put new ones in. might as well. once again i had a problem with one of the brake lines (the passenger side this time) and ruined one of the bolts. so i'll need to buy another hard line. no big deal. it was really easy bending the other one for the front. i should have bought all new hardlines and just not worried about it. especially since i have all new stainless steel hoses.

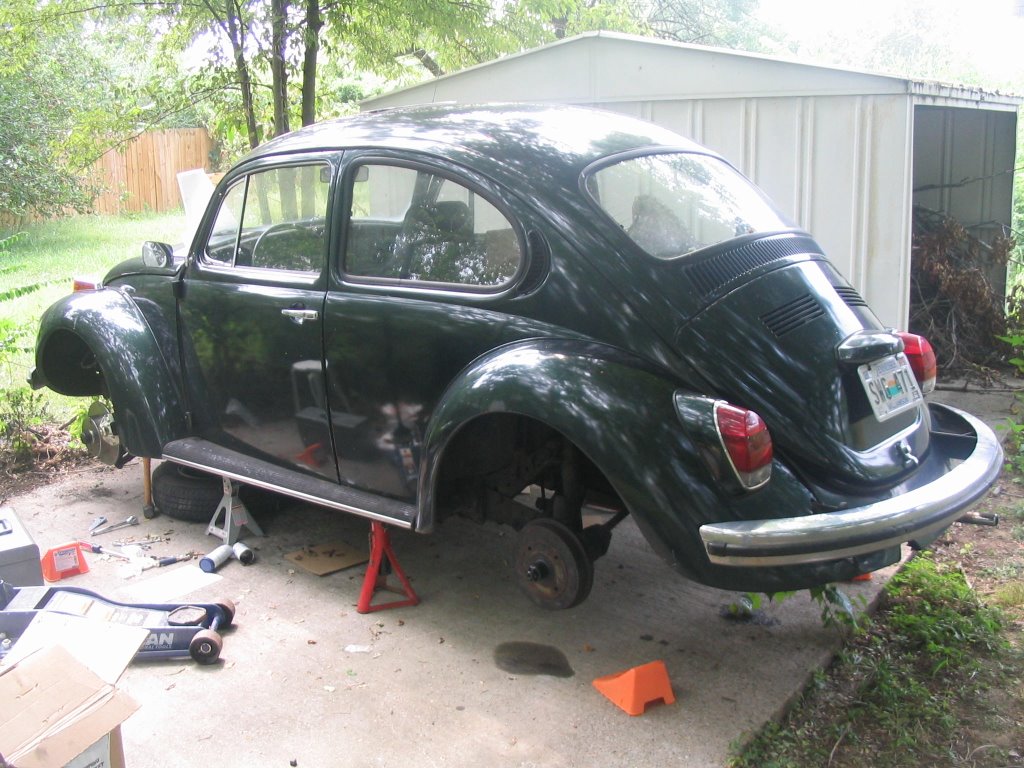
so that's where i stand now. front brakes are done except for bleeding (that'll happen once i get the new master cylinder in) and the rears are just waiting new bearings so i can put the rest back together. as always, i snapped some pictures of the progress.
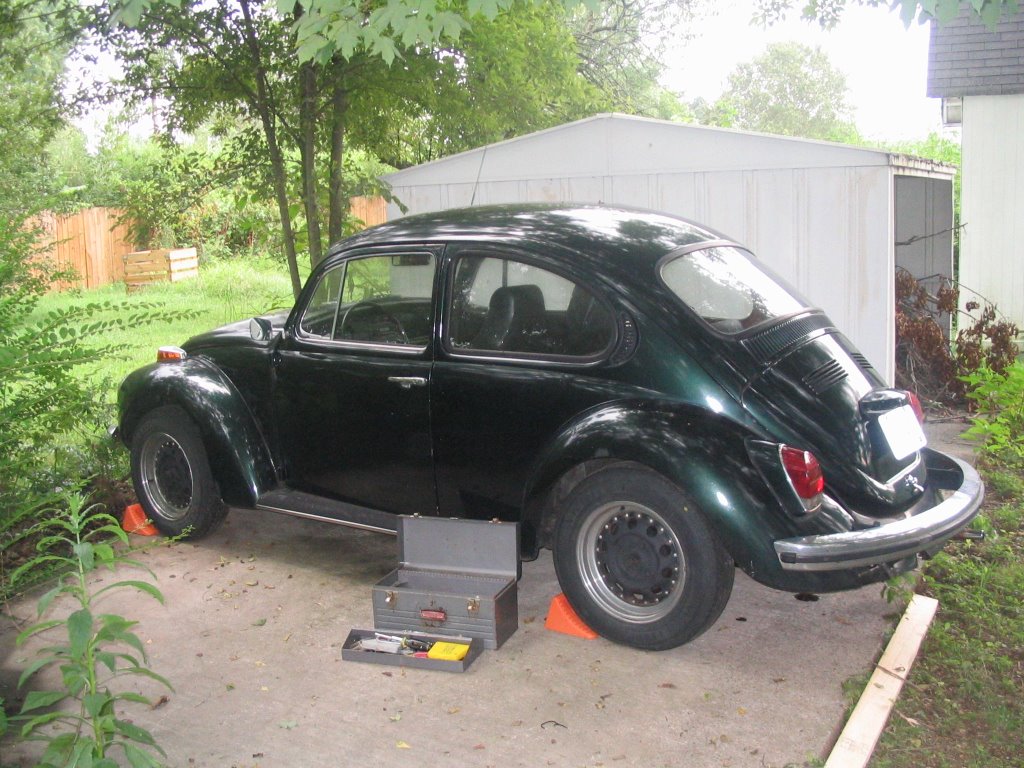

look ma! no wheels!


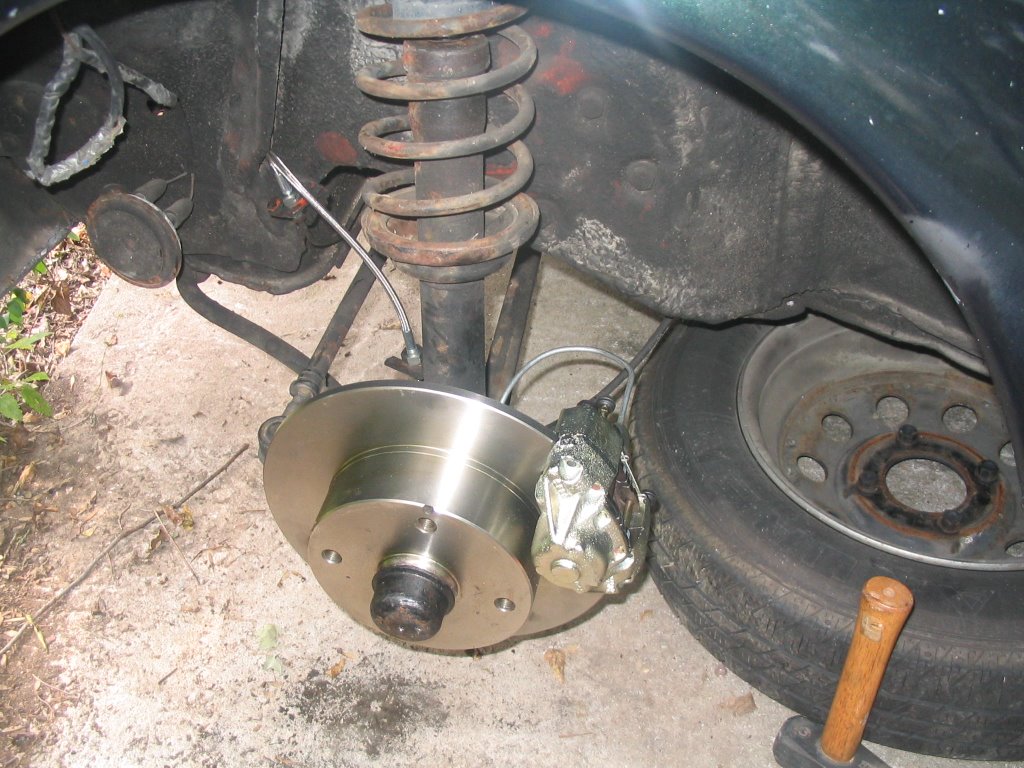
a shot of the passenger side disc and caliper (checkout my trusty sledgehammer)


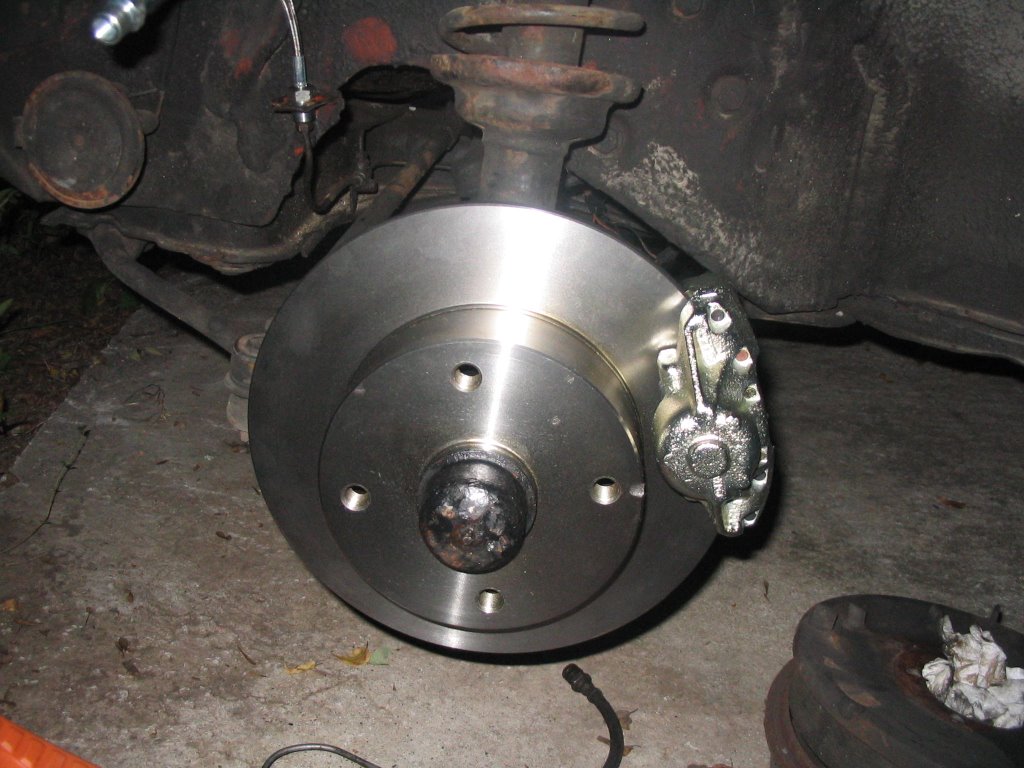
another shot of the passenger side


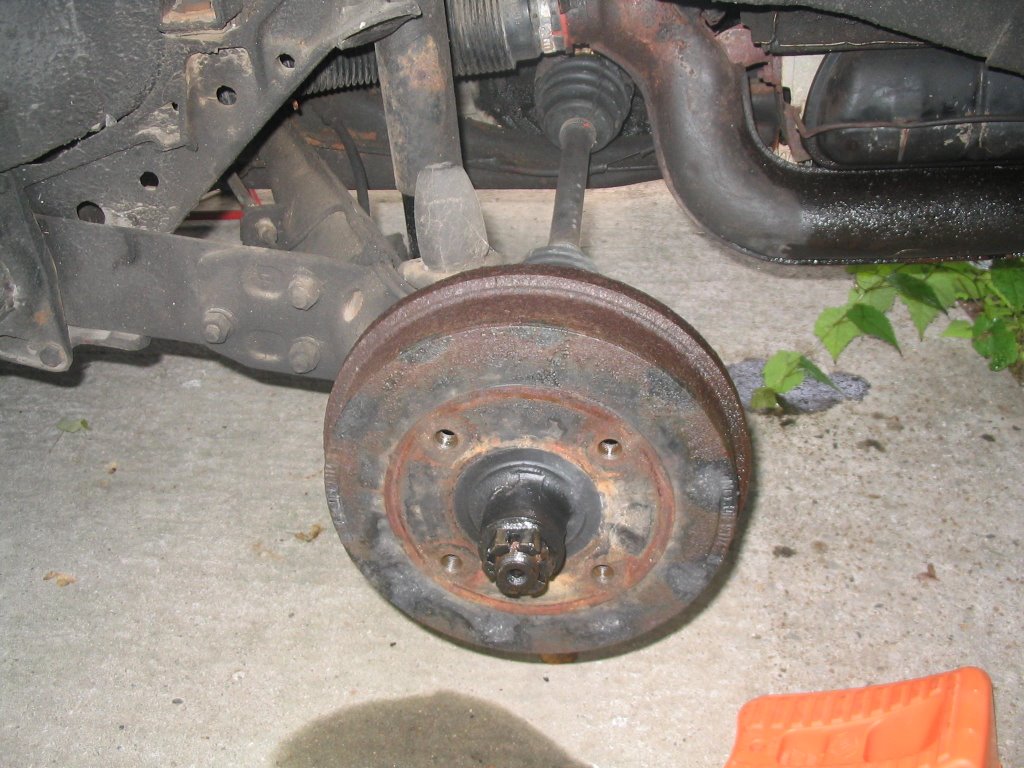
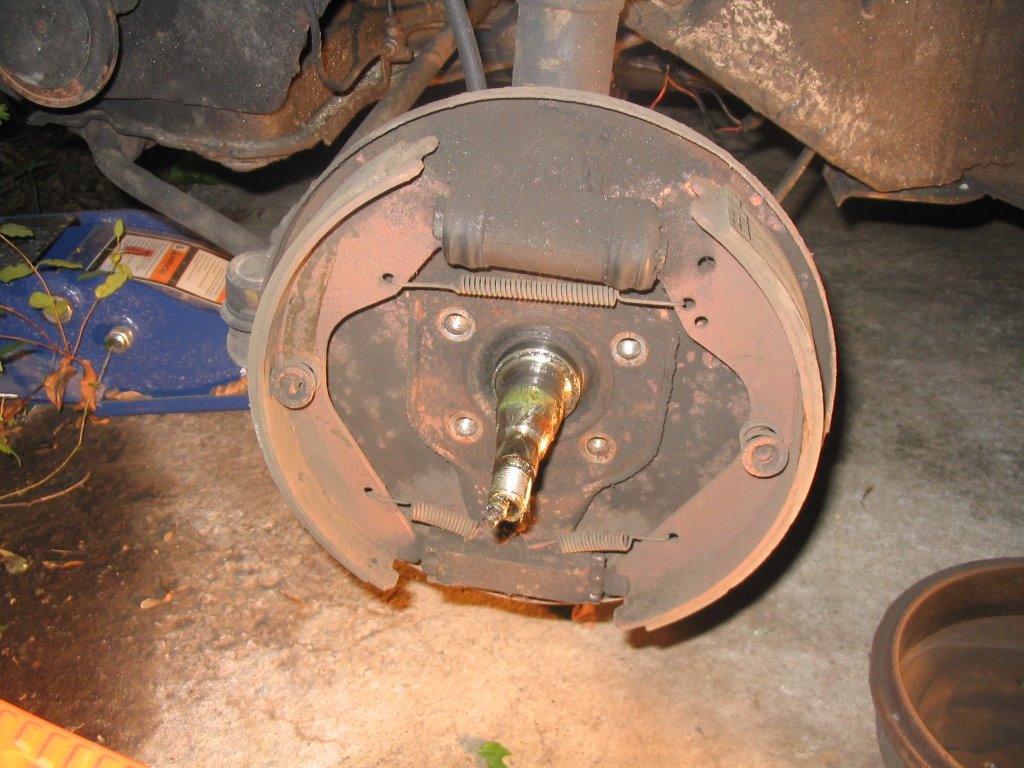
a shot of the nasty driver's side drum before i tore it down

Friday, August 25, 2006

success

last night was great. i wasn't planning on doing any work but all of our friends that we were going to meet with are sick. once i got out there, the first thing i realized is that i had the caliper brackets on the wrong side. it's amazing how much easier something is when you have some pictures of the final product. once i swapped the brackets, the caliper lined up right where it should be. i also found a great set of directions and notes here. they put on the same kit that i have and posted the directions with all of their notes. they have a great section on packing the bearings and rotor and then how to fit it all on the spindle.

my main problem was that i wasn't putting the grease seal on properly (those directions were omitted from the ones i had). so i packed the rotor up with grease, dropped in my pre-packed bearings, pounded in the grease seal and i was ready to rock and roll. took me a little while to get the rotor on and figure out exactly how far to tighten down the clamp nut and get it adjusted properly. luckily, rob and dave's directions went into great detail in this area too. once i got the rotor on, i slipped the caliper on and mounted it. there is a little problem in that the inner side of the rotor rubs on the inner brake pad. i'm trying to figure out if i put the rotor on too far or what. the last item of the night is that i pressed in the bearing races for the passenger's side.

i'm hoping to get out of work a little early today and slap that other rotor and caliper on before tonight. i have a mechanic friend that's coming over to help me with the rear gland nuts and also take a look at why my car won't idle. so hopefully we'll get everything ironed out this weekend. here is the new disc and caliper in all it's glory.


aren't they pretty?


here's a more straight-on shot.

the only thing left of this side (besides getting the rotor not to rub) is to bend the new brake line and hook it into the caliper.

Thursday, August 24, 2006

frustration

i was all geared up to get rotors and calipers on last night. well, i got neither on. the first problem is that i was pretty confused by the kit directions on where the bearings actually went. but thankfully my bentley manual has nice pictures that helped me figure this out. it then took forever for me to press the outer races down to where they should be. but once that was done, i slipped the packed bearings into place, slip the rotor on and then couldn't figure out how far to push the rotor on. it kept wanting to slide all the way to back on the spindle but that totally interferes with the caliper bracket. the directions just say to slide it on, then put on the thrust washer and screw on the clamp nut. then check for end play. but no idea on how far to go. so i've emailed the people i got the kit from in hopes that they can help.

after that debacle, i still had daylight so i decided to do some small stuff. i bought some speed bleeder's to put in the calipers and rear drums, so i thought i'd put those in. too bad the ones i got don't fit in the caliper! argh! i bought all this stuff from the same place assuming that they would fit. that's what you get for assuming.

next, i thought i'd try and start tearing down the rear brakes. pulled out the cotter pins, broke the lugs and then went to work on the 36mm castellated nut. i was using a 1/2" breaker bar and a 3' section of pipe. i ended up bending the pipe and getting nowhere. i liberally soaked the nuts a few different times but to no avail.

at this point i was ready to break something, so i just cleaned up and went inside. what a horrible night! i won't have time to work on it tonight, so hopefully by friday i'll have figured out the rotor problem and get these things done. i was hoping to have all my work done by monday but i don't think that is going to happen. sigh... the joys of working on a car.

Wednesday, August 23, 2006

i really hate brake lines

i got another 3 hours or so of work in last night. overall it was good but i did have one setback. i'll get to that later.

first off, i got the driver's side backing plate off pretty easily. i had to take off the bleeder valve in order to take off the brake line. it was just stuck to the spindle with years worth of crud and a little rust. once i got it off i detached the rubber brake line from the main line and put on the new stainless steel line. however, i couldn't get the rubber hose separated from the tiny hard line that goes from the rubber hose to the backing plate (soon it'll go to the caliper). i used a ton of liquid wrench and just beat on it. it wouldn't even budge when i used vice grips! needless to say, i pretty much rounded the bolt on the one side. so i need to call up the local VW parts place and see if they sell that little hard line.

the good news is that i got the caliper mounting bracket all hooked up and once i pack the bearings tonight, i can put on the disc and mount the caliper.

next, i switched over to the passenger side and ripped it all down. took me about 5 minutes! shows what you can do the second time around. had a little trouble getting the rubber hose off of the main line but my vice grips worked like a charm and i didn't harm the main line. i cleaned off the spindle, put on the caliper mounting bracket and this side is also set for bearings, disc and caliper. hopefully i can get all the done tonight and be mostly done with the discs.

i love how my directions said it would take 3 hours to do the whole thing. i've spent close to double that. i guess they mean it'll take 3 hours if you don't have rusty bolts or any other problems and you've done this before. below are more pictures i snapped last night.


here's a shot of the driver's side all stripped down to the spindle.


this is what the driver's side looks like now. the caliper bracket is in place and so is the stainless steel line.


here's a shot of the finished passenger side. caliper bracket is on and the stainless steel line is all set.


i thought this was a funny name for a company that makes bearings. too many jokes were swirling around in my head after seeing this.

Tuesday, August 22, 2006

the first post!

here i am, finally entering the 21st century. as some of you know, i'm currently doing a bunch of work on my 1971 Super Beetle. i've had a bunch of request to post pictures and keep people up-to-date on the whole process. so i just decided to create a blog and see what all the commotion is about.

i officially started working on the bug on sunday. but i really just tinkered with the carburetor to see if i could figure out why it's not idling. i found a few leaks but the carb looks really clean. so i'll fix the leaks later and see if that helps.

last night, monday, i started ripping apart the front brakes in preparation for putting on discs and calipers. i got it all jacked up and the driver's side brakes down to the backing plate. i removed the four bolts that hold the plate in but it still didn't want to budge. it was after 8:00 by then and pretty dark. so i decided to wait until i had more light and more patience to get that off. i'm hoping that i can finish up the disc install on that wheel tonight and at least get the passenger side ripped down to the spindle. below are some photo's i snapped of the whole process.


here is the 'garage.' not a bad place to work. just had to trim some of the bushes back. at least i don't have to work on it in the gravel driveway.


this is a shot of the driver's side drum. doesn't look too bad.


the glorious sight of new disc brakes. they look so much better than the drums (and hopefully they'll stop better too).


this is where i stopped last night. the lighting is weird from the flash and my work light but you get the idea. lots of brake dust in there and not much lining left on the old shoes.