Thursday, December 14, 2006

here she is...

to appease the masses, i quickly took some shots of the car tonight before the sun was completely gone. here they are!


with the flash...


without the flash...

how about those white rims?!

since i'm posting pictures, i'll post some of =the wood that i've been gathering for next year. we decided to get a woodburning stove for our house this summer (we'll just get the matte black finish). so i started going around and getting free wood from friends, neighbors, whomever. subdivisions are great places to find trees. most places fell the trees, cut them up and just leave them. then i come along and load it up. works great. nothing like getting something for nothing.


here's what i started out with...


here's another angle...


this is what i've built it up to. in the background is about a cord of wood stacked. i have a huge maple tree that's already cut up at my bosses house that i'm slowly bringing over to our house. i'm hoping to have about 5 cords for next year. the way i'm going now, i'll easily have that. i may stockpile some as well. just to make sure i have enough.

enjoy!

building up strength

wow... it's only been a week since i last posted! i told you i'd get better. alas, i still haven't had time to take pictures but i'm hoping to do so this weekend. i know, i know, i keep saying that. but you will see pictures soon. i just don't know how soon.

so over the weekend i went to take the bug for a little test drive and i couldn't get her started. plenty of gas and spark but no fire. it was weird. so my friend paul swung by after work last night and he couldn't figure it out either. after he left i remembered that i'd reattached the electric choke wire after i'd shut it down last wednesday. i didn't see how that could preclude the engine from starting but i was frustrated and ready to try anything. unhook the wire, crank, crank, VROOM!! crazy stuff. so i let it warm up, idled still really smoothly so i decided to drive it around our yard some. got it over to the driveway and did some runs back and forth. the brakes weren't grabbing like i thought and it seemed to have no power at all. but, i grabbed my new license plate, stuck it in the window and took it for a spin around the neighborhood.

it wasn't bad. just no power at all and the brakes aren't what i think they should be. they are better than before but the front end should really be diving (i kept trying to lock them up) and it's not. the pedal is a little spongy so i'm just wondering if it needs a good powerbleed. as far as the power issue goes, i'm thinking the carb needs a good tune. hopefully that'll cure it. i know it's running rich. so who knows.

overall, i'm happy that it's starting, running and stopping. i just need to work out the kinks and it should be good to go.

Thursday, December 07, 2006

IT'S ALIVE!

wow... i sort of feel like dr. frankenstein this morning... but more on that later.

hello faithful readers! if i have any of those left. i know it's been forever since i've posted, but nothing has happened on the bug since my last post, until last night. between an awful work schedule keeping me at work until all hours of the night and morning to other household projects getting in the way, i have had no time for the bug. however, that all changed last night. here's the scoop...

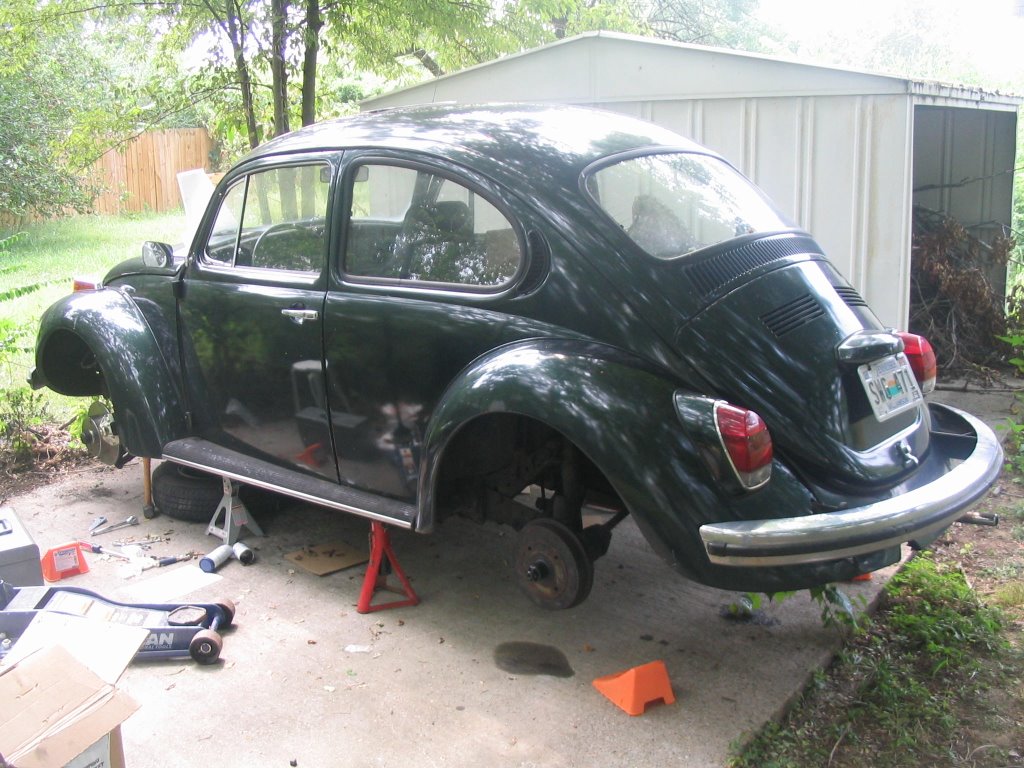
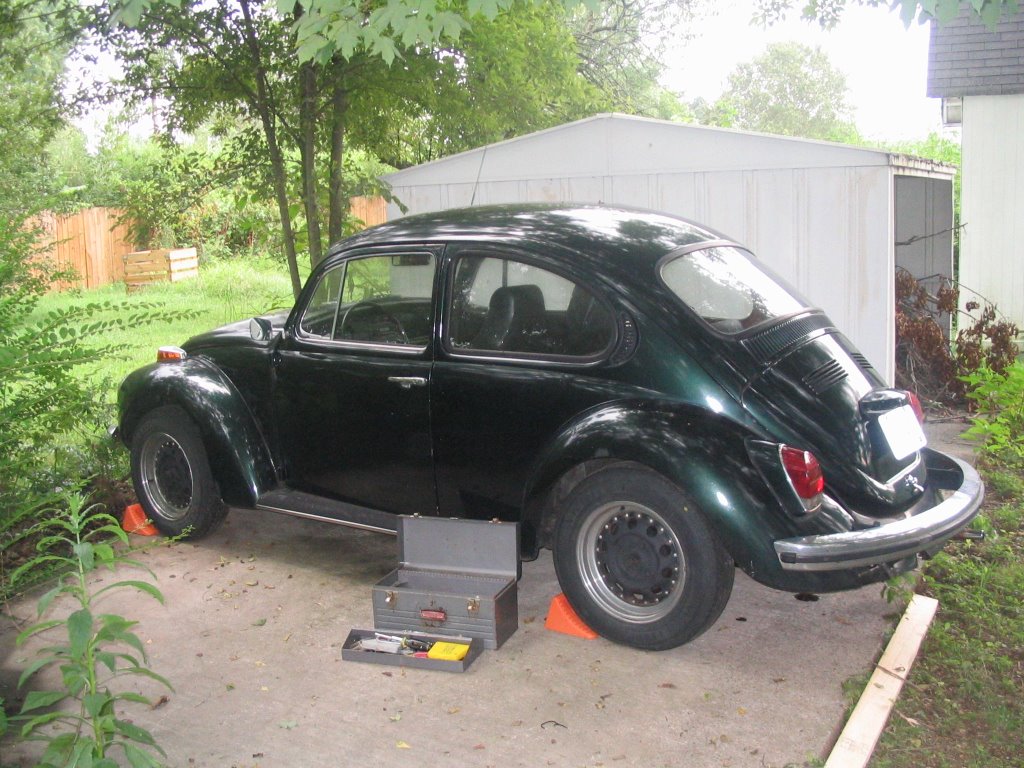
my friend paul, who is very gracious to help me out, came over last night to help me with the last few items. he'd already mounted a balanced the old tires on the new front rims. i'll have to post some pictures of the new look. it's not bad, but definitely different.

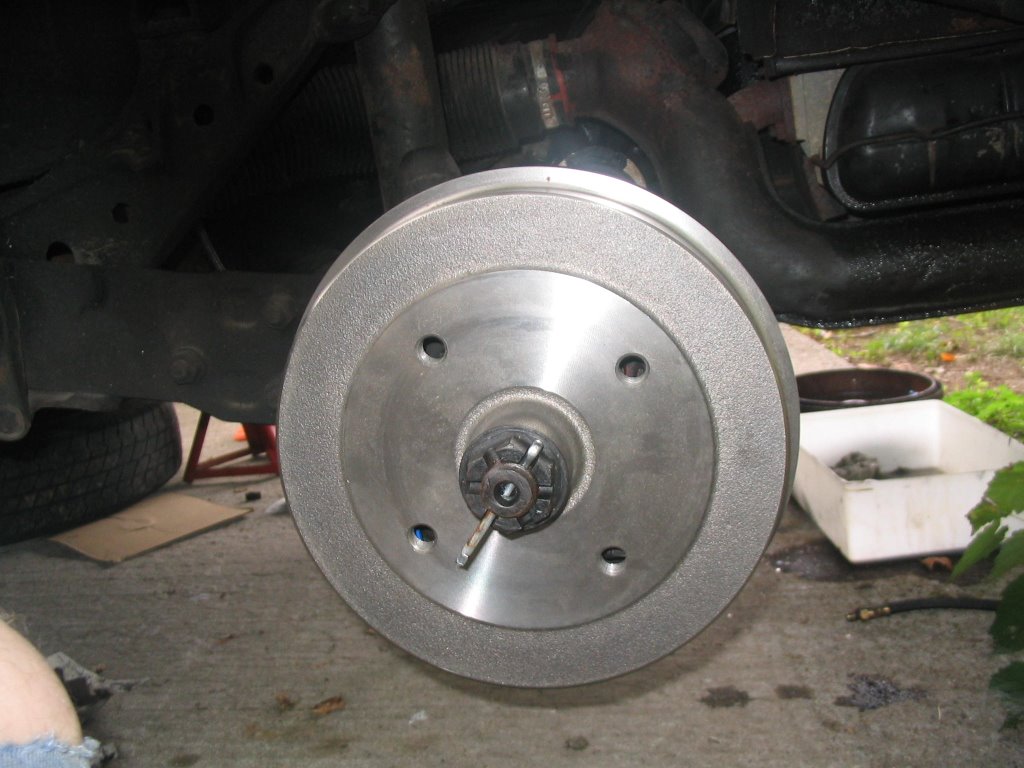
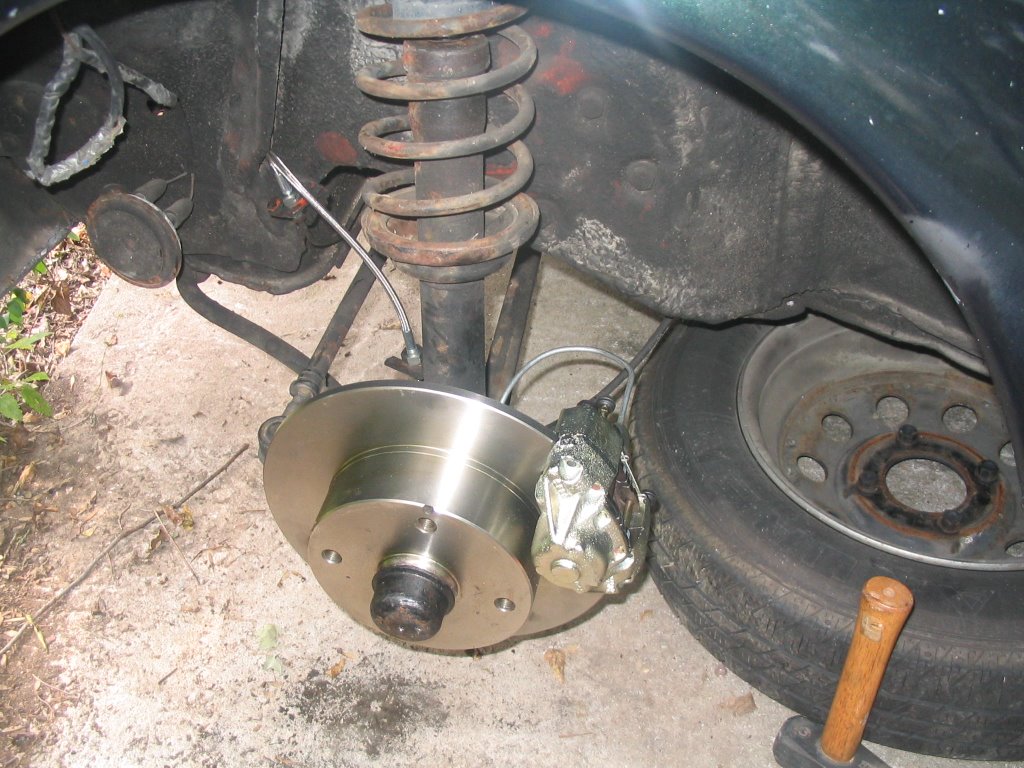
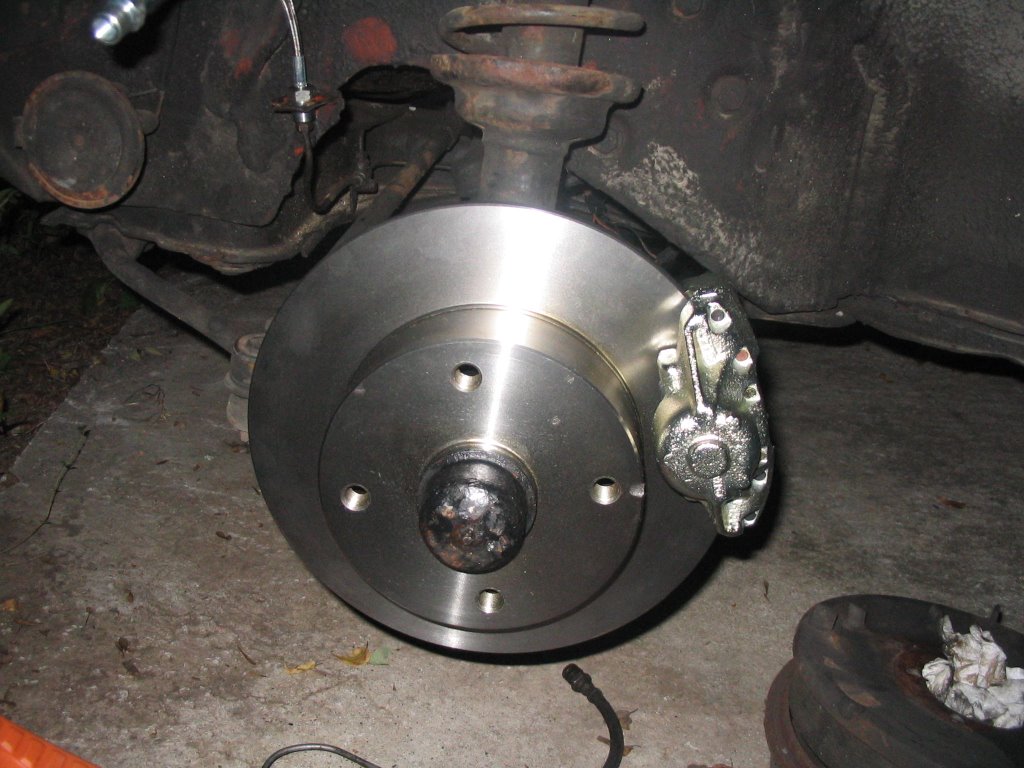
anyway, i'd gotten the front rims on before he came over and there are no caliper clearance problems! so things were starting off right. first thing we did was to tighten the rear axle nuts so that we could put the cotter pins in. i'd already torqued them to 215 ft-lbs. but they needed just a little bit more for the holes to line up. he brought this massive 3 or 4" long socket and we went to work. got everything lined up and the cotter pins in.

next item of business was hooking the accelerator cable back up to the carb. not a big deal. we got that done and within correct spec.

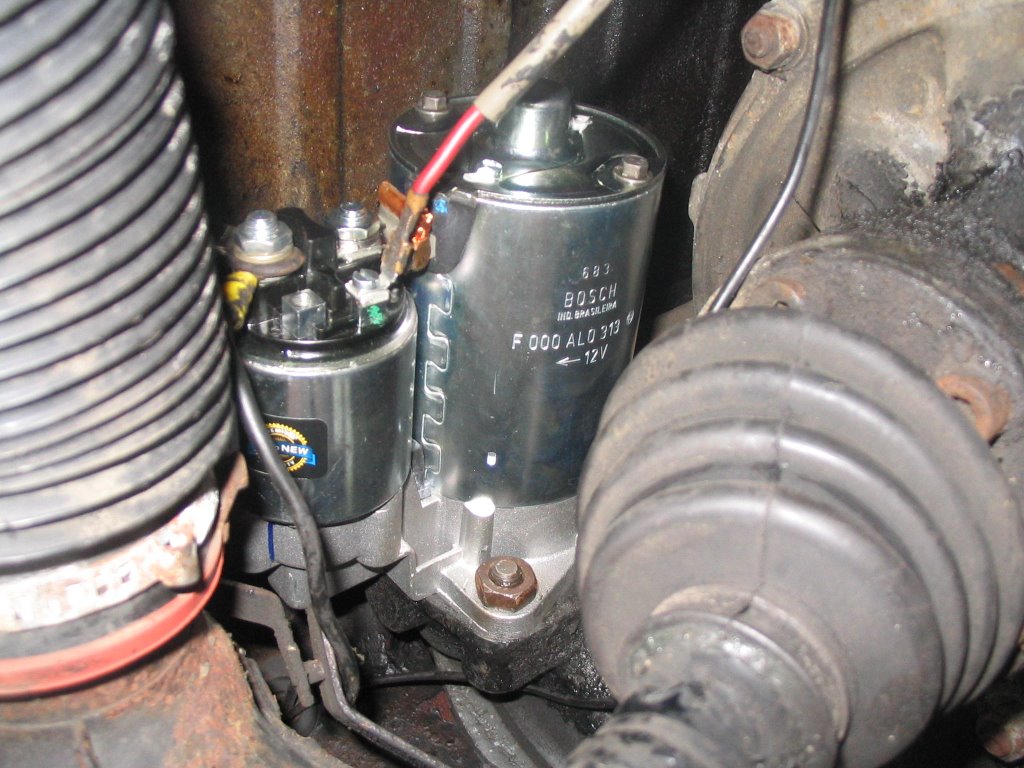
so the moment of truth came. i tried to start her up and she cranked like crazy (the new starter is awesome!) but no fire. so we checked the spark and absolutely none. first thing paul noticed is that the spark plug wires weren't on the plugs correctly. i'd thought that there was a problem before and since forgot. so we took the new plugs out, twisted off the new type connector and put them back in and everything fit great. tested the spark again and nothing. tested it from the coil and barely anything. i just put a new coil in last year, so i'm hoping it's not that. but i still had my old one, so we hooked that one up and even less spark. so then we start tracing lines. everything is hooked up properly but paul notices a break in the hot wire to the coil. it had already been "fixed" like most of the wires in this car but the junction was really bad and corroded. so we made a new fix, checked the spark and it was awesome. nice and blue and very strong. so we hook up the wires again and start cranking. it took a while to get her started but she did fire up. paul was manually working the throttle. once the engine got warmed up and working again (took about 10 minutes) she ran on her own just great. no more intake leaks and she runs stronger than i've ever heard. we noticed that she's running rich, but that's probably from the previous owner compensating for the intake leaks. so i'll drive her around some more and see if i can't lean it out later.

but she ran for about 45 minutes last night. worked all the junk out and was running really smooth. it was 9:00 by the time we were finished, so i didn't take her out for a test run. but, i'm working from home today, so i'll have to take a little break later on today and take her out. first a drive through the yard to make sure the brakes are ok, then i'll take her out on the road. i'm really excited.

once again, kudos to my friend paul and to all of you who gave me advice and encouragement. i'll post up some pictures of the bug later and also some pictures of my recent projects. now that the bug is back on the road, i'll have to start focusing on some other things.

that's all for now. i promise it won't be months before the next post...

Friday, October 20, 2006

back and better than ever... sort of

hello to all of my faithful readers, if i have any left. sorry that it's been so long but crazy work hours, sickness and a general laziness have gotten in the way of me finishing up the bug.

however, i do have some updates. i just completed an order for two new rims that should fix my clearance issues on the front wheels. the rims i got come from Chirco Performance and are your standard, white spoke wheels. i got 15x6 rims which are the same size as the ones i have now. so i'm assured that my tires will swap right over. i'm going for a very interesting look... white rims on the front with black/chrome rims on the rear. maybe one of these days i'll sand down the new rims and paint them flat black so they match somewhat. but at this point i just want my car back and i don't really care how it looks. not like it's beautiful anyway.

i'm hoping that i'll find some time this weekend to actual fire up the beast and see if she'll run on her own power. that way i'll have some time to fix any engine issues before the rims get here.

i'm hopeful that i'll have the bug on the road before november and just in time for the cold weather. good thing that my heater boxes work well!

Tuesday, September 26, 2006

will i ever finish?

i meant to post this all yesterday, but i was quite busy at work and never had time. so here it is today...

this past weekend we had a lot of rain. so i worked on the bug between rainstorms saturday and most of sunday afternoon. i did get a lot of good work done. the engine is all back together and i think it's back together properly. brake lights are hooked back up and the car is off of the jackstands. i was going to start 'er up on sunday but the clouds were forming again and i didn't want to get stuck outside in a downpour. so i cleaned things up and went inside.

in order to start 'er up, i just need to attach the throttle cable to the carburetor and i'll be all set. i'm still kind of scared to start 'er up, though. i don't know why but i keep imagining the engine just blowing up. guess i'll have to get over that fear soon.

the only bummer to the weekend was that i realized the wheel spacers i bought for the front are too thin. the caliper bulges out a lot more than i thought and 1/8" spacers just aren't enough. i'm thinking i'll need about 1/2 to 3/4" spacers to get the job done. i need to call up top line and see if they'll exchange the spacers i got for some thicker ones. course, i need to actually measure the thickness i need and scrounge up some longer wheel bolts (VW's of this era don't have wheel studs).

i will say that not having studs is a major pain when you are trying to put spacers and a rim on. luckily it wasn't too bad and i got them all back together. hopefully wednesday i'll get the courage to fire 'er up and we'll see how the engine runs. obviously, i'm hoping that all the work i did fixed the idling issue. it should get me running smoother and a might more power. i guess we'll just have to see.

Thursday, September 21, 2006

slowly moving closer and closer

for those of us that mostly do projects on our own and typically aren't experts in what we're trying to do, it's amazing to see what can get done having help from someone who knows what they are doing.

my friend paul came over last night and we got some really good work done. first off, the passenger side brakes were having problems because the adjusting star was really cranked down on the bushing (who did that?). so we broke those loose, adjusted the passenger side and the brakes are set. and boy are they tight! 4 clicks on the parking brake and they are solid. put your foot on the brake and it goes down a little and just sits there like a rock. amazing!

we then moved to the engine. after poking around and figuring out that the nut i dropped wasn't in the engine or anywhere around the spark plug holes where it could drop into the engine, we decided to just leave it. we then spent a ton of time trying to get the fan housing back into position. what a pain! anyway, we got it back on finally and it's all in place. we then gapped and changed out the old spark plugs with new ones and called it a night. the intake is still apart but it shouldn't be too hard to get it back on then replace the cooling tin. i'm really hoping that this weekend it'll be back on four wheels and i'll at least get a chance to fire it up.

Wednesday, September 20, 2006

notes from a slacker

since some of you have asked me what the heck i've been doing lately, i thought i'd put up a little post.

the last week and a half has been really busy for us. i have really only had a couple hours to work on the bug this past saturday. didn't do a whole lot. fished around for that nut i dropped to no avail and started to adjust the rear brake shoes. i was really successful with the driver's side rear but am having a problem with the passenger side. for some reason, i can't adjust the shoes out anymore. the stars just won't move. it's either because of the springs being really tight or maybe some debris in the threads of the stars. i thought i cleaned them out pretty good and they screwed on ok. who knows. but, i have tonight completely free and my friend paul is coming over to help me. hopefully we'll be able to get some good work done tonight and maybe even try and start 'er up.

Monday, September 11, 2006

so close and yet so far

it seems like my posts are getting more and more depressing. they started out so carefree and fancy-free. i guess the drudgery of a long project is starting to set in. here's an update of the work from this weekend.

friday i got a day off from work and tried to spend it on the car. i ended up getting the brakes totally bled and i have a nice firm pedal. i got some nice 1/8" wheel spacers thursday for the front. now all that needs to be done is to adjust the shoes in the back and the bug will be back on the ground.

saturday i went to work on the bolts that i'd broken off. using some left-handed drill bits, i slowly ate away at them. they just wouldn't budge. even using an easy-out they just won't come out. too many years of heating and cooling and rust. i decided just to leave them and get a machine shop to fix them once i get the car running. after that decision, all i had to do was button up the intake manifold, install the new spark plugs and i'd be ready to rumble. the only problem is that i dropped a nut between the cooling tin and my #4 cylinder. i almost started crying. luckily it's not in the engine but i can't reach it, feel it or get it out. i started to rip off the fan housing but it's still stuck on something. after much frustration and tiredness (i'd already been out there all day), i called it quits. i may stop by sears on my way home today and see if they have a strong, flexible magnet that i could use to fish it out. it's so tight on that left side but it might work. it'd sure beat taking all the cooling tin off for one nut. at least i know i'll be home free after this. barring any more fumbling.

Thursday, September 07, 2006

solo bleeders and spiders

last night i was finally back in action. ran into a new nemesis and a couple old ones. the new nemesis i ran into was something called a solo bleeder. they replace your brake bleeder screws and are supposed to help you bleed brakes. they have a spring with a little brass ball attached that acts like a one-way valve when you crack them open. this way you can bleed the brakes by yourself. i had installed them on my rear drums but when i went to bleed them last night, they were too big for the bleeder hose that i had. so i went to remove them and just put the stock ones back in (make sure you always save old parts!). to my surprise, the little brass ball got stuck in both of my wheel cylinders! luckily, i was able to pull them out with some needle-nose pliers but there was a lot of heart palpitation, some slight swearing and good ol' nervous sweating. not surprisingly, i'll be putting in an RMA request to get my money back on these things.

i tried to make some progress last night but i didn't get too far. i bled all the brakes but i'm still getting a lot of air bubbles. i think that i got some air into the master cylinder which could prove to be a nuisance. i can't get a firm pedal at all. hopefully i can keep bleeding it and get all the air out. i really don't want to have to get a power bleeder or try and bleed the master cylinder by itself. since i can't get it off the car, this would prove pretty hard.

i ended up going in last night after a large scale battle with a couple of spiders. for those of you who know me, you know that i really, really hate spiders and i'm scared of them. so even killing a spider is a tough job for me. anyway, it was almost 8:00 last night, really dark and these two really ugly, big spiders are in one of my fenders looking like they want to kill me. but i got the better of them and then decided it was time to go in.

doing all this work has not only taught me about my car but it's also acclimated me to the insects of TN. spiders, all sorts of flying things and maybe the grossest... ticks. i realized monday that i had a little friend living off of me and i found another one this morning. luckily, i've been able to pull both out, heads and all and so far no sign of lyme disease. this is just another reason to work on getting some sort of garage at our house. working outside is just the pits. but hopefully i'll be done soon. keep those fingers crossed!

Sunday, September 03, 2006

is it fall already?

with the weather in tennessee the last few days, would think it was fall already. mostly overcast, chill breeze, temps in the mid-70s. it's been such a nice break from the high heat and humidity we were having.

today, you get a two-fer. i'll be posting about work that i did saturday and today. after running a bunch of errands with the family on friday, i decided to relax friday night. it was a nice break. onto the work!

saturday, finally finished up the last brake drum and bent the new line to replace the one that i couldn't separate. it's amazing how quickly you can do something the second time. the first brake drum i did took me 40 minutes to get all the springs and clips into place. the second one i did on saturday took me 5-10 minutes. it might have been the difference between late at night and mid-morning but it was insane. not that i'm complaining! being able to finish it up that quick was great. the only thing left to do on the brakes is bleeding. i figure i'll do that once i get the engine stuff done and i'm actually ready to take it out on the road.

the next thing i worked on is that starter. remember how i'd had to stop because i couldn't get the lower nut off the stud? well, i got into place, sprayed some more liquid wrench, got my trusty wrench and it came right off! hurray! i wiggled the old starter out and had a look. man, does it look old! but i'm keeping it to take it apart and see what's inside. yeah, i'm a nerd but i've never seen the inside. once i got it out, i tried and tried and tried to get the bushing out. nothing seemed to work. i called up my friend paul who came over and had a look. he couldn't get it out and said that he would just leave it. the bushing looked to be in good shape and it'd really be a chore to get it out. so i took his advice. i mounted up the new starter and got everything tightened down. pretty simple.

i was still feeling ambitious and had energy at this point, so i decided to start working on the engine. i managed to disassemble the lower cooling tin in order to get to the heat riser bolts. the left side came out fine, but the right side decided they both wanted to break. so now i get to learn how to use an easy-out. oh well. i started to also take apart the rest of the intake manifold but i realized that i needed a 12mm swivel socket and a big extension to get to the 2 nuts on each side. at this point it was getting late and i was tired. so i packed everything up and started to mow the lawn until the rest of my family came back home. too bad the lawnmower suddenly stopped going into gear as soon as i was done with the front lawn. sheesh! what now!? guess that'll be my next project...

pictures from saturday are below:


new guts of the driver's side drum. hopefully they stop as well as they look.


the new drum in place.


can you tell which one is the new starter?


here's a shot of it all mounted up. notice that you're looking through the inside of the rear fender.


another shot of it mounted. this time from below.

onto today's progress... after church, sears and the grocery store, i finally made it outside. i didn't really have a goal. just to work for a few hours. with new tools in-hand, i set to my task. loosened all four intake manifold nuts with no problem. loosened the one in the middle and was able to slide the right-side manifold off with no problem. i had a new gasket for where the manifold meets the head that i had to trim up, but no big deal. i then started to take the left side off but realized that the fresh air pipe coming off of the fan housing is in the way. the only way to get it out of the way is to completely remove the housing. ugh! so i'm thinking i may not replace the gasket on that side. just replace the boots and call it good. that's really all i got done. not much to show for 2 hours of work. but the boots are all ready to slip on and then i can put the manifold back together. i'm also installing the new spark plugs while the manifold is out of the way. more pictures:


manifold almost ready to come out.


and it's gone...


here's a comparison shot between the new and old intake boots.

happy labor day everyone!

Thursday, August 31, 2006

getting closer

i made some nice headway last night. i was hoping to get both sides of drums all buttoned up but that didn't happen. i ended up checking the bearings, repacking (not using the new ones i bought) and then i got the passenger side all buttoned up. i would have had the driver's side done but i broke the little clip that the parking brake lever uses to attach to the shoe, so i need to pick up one of those today and i'll be done with the drums.

i do realize now why people don't like working on drums. the springs were a pain to get on and get everything lined up. discs are so much better. but i was able to get them on and at least they aren't complicated.


here's the new guts of the passenger side. new wheel cylinders, shoes and springs.


here's the nice shiny new drum. all this side needs is the new brake line bent and attached.

Wednesday, August 30, 2006

rust is a worthy opponent

last night i decided to go out while it had stopped raining and at least try to get my new starter installed. first off, the starter is so hard to get to, it must have been one of the first things on the car when they built it. my service manual should have told me to remove the body in order to get to it. anyway, i unhooked the two wires making certain that i knew where they went on the new starter. i got the upper mounting bolt nut off (that's in the engine compartment behind the fan!) and then went to work on the lower nut. it's encased in rust and after several application of liquid wrench, it's still on the car. it's so tight in there, that i couldn't get a ratchet on the bolt and had to resort to a wrench. and there's barely room for that. so i soaked it again and left it.

after that disappointment, i decided to try and get the old master cylinder off and get that area ready for the new one. after looking around, i decided to just leave the old one on for now and not even mess with it. the steel brake lines seriously look soldered on. they are extremely tight and i know that i'd just end up having to replace all the lines. this is another item that is just awful to get to. i could barely get my flared wrench in there to try and get the lines off and then i had no room to break them loose. ugh.

at this point, i just packed up and went inside. the cloud of mosquitoes was laughing at me but i didn't care. today i'll pick up new rear bearings and gaskets and another steel line in order to get the brakes done tonight. then i'll just have the starter and some engine work to do.

Sunday, August 27, 2006

getting there

i'll go ahead and do two posts in one today. it was like a blast furnace outside, so i didn't work at all today. but, i got some good work done on friday night and saturday.

as for friday, i got home a little early from work and immediately went outside. packed the passenger side bearings, slipped the rotor on, adjusted the endplay, slapped on the caliper and voila! passenger side done. the interesting thing is that i had no pad rubbing issues like on the driver's side. about an hour later, my friend paul and his family came over. the kids played with each other inside and he and i got down to the business of breaking the rear axle nuts. he'd brought a huge 3/4" ratchet with a matco 1/2" adaptor and a big pipe. we sprayed some more penetrating oil on (he brought some special stuff from his shop) and went to work. well, the only thing paul ended up doing was literally just picking up the car and turning the wheels. he was shocked. so he gave it one final shot and we hear a big pop! we thought he'd loosened the nut, but he'd actually busted the matco adaptor! sheared it right off. so we laughed and headed over to his shop. after rummaging around, he found a snap-on adaptor and socket (probably $100+ right there) and we headed back. this time, i sat on the back end to try and keep that down. we put the chocks in place and he went to work. bang! we both looked at each other not knowing if we'd broken the snap-on stuff or actually gotten the nut loose. fortunately, it was the nut. so one side down. went over to the other and bang! second nut done. it's amazing how the right tools really do work. i know that snap-on stuff is terribly expensive but it does work.

saturday was a nice day. i ended up fixing the driver's side caliper clearance issue by putting another washer on the caliper screws. now there is just enough clearance between the pad and the rotor so they don't rub. i checked the rotor out and it's on there properly and the end-play looks good. so hopefully this will be a good fix. i then jacked up the back of the car and got to work tearing down the rear drums. it really wasn't that bad of a job, just really messy. the side that had the leaky wheel cylinder was especially nasty. many years of brake dust coupled with brake fluid made for a black sludge that coated everything. but i got it all off without a problem, all the way down to the backing plate. i didn't buy new bearings for the rear, but i think i'm going to go ahead and put new ones in. might as well. once again i had a problem with one of the brake lines (the passenger side this time) and ruined one of the bolts. so i'll need to buy another hard line. no big deal. it was really easy bending the other one for the front. i should have bought all new hardlines and just not worried about it. especially since i have all new stainless steel hoses.

so that's where i stand now. front brakes are done except for bleeding (that'll happen once i get the new master cylinder in) and the rears are just waiting new bearings so i can put the rest back together. as always, i snapped some pictures of the progress.


look ma! no wheels!


a shot of the passenger side disc and caliper (checkout my trusty sledgehammer)


another shot of the passenger side


a shot of the nasty driver's side drum before i tore it down

Friday, August 25, 2006

success

last night was great. i wasn't planning on doing any work but all of our friends that we were going to meet with are sick. once i got out there, the first thing i realized is that i had the caliper brackets on the wrong side. it's amazing how much easier something is when you have some pictures of the final product. once i swapped the brackets, the caliper lined up right where it should be. i also found a great set of directions and notes here. they put on the same kit that i have and posted the directions with all of their notes. they have a great section on packing the bearings and rotor and then how to fit it all on the spindle.

my main problem was that i wasn't putting the grease seal on properly (those directions were omitted from the ones i had). so i packed the rotor up with grease, dropped in my pre-packed bearings, pounded in the grease seal and i was ready to rock and roll. took me a little while to get the rotor on and figure out exactly how far to tighten down the clamp nut and get it adjusted properly. luckily, rob and dave's directions went into great detail in this area too. once i got the rotor on, i slipped the caliper on and mounted it. there is a little problem in that the inner side of the rotor rubs on the inner brake pad. i'm trying to figure out if i put the rotor on too far or what. the last item of the night is that i pressed in the bearing races for the passenger's side.

i'm hoping to get out of work a little early today and slap that other rotor and caliper on before tonight. i have a mechanic friend that's coming over to help me with the rear gland nuts and also take a look at why my car won't idle. so hopefully we'll get everything ironed out this weekend. here is the new disc and caliper in all it's glory.


aren't they pretty?


here's a more straight-on shot.

the only thing left of this side (besides getting the rotor not to rub) is to bend the new brake line and hook it into the caliper.

Thursday, August 24, 2006

frustration

i was all geared up to get rotors and calipers on last night. well, i got neither on. the first problem is that i was pretty confused by the kit directions on where the bearings actually went. but thankfully my bentley manual has nice pictures that helped me figure this out. it then took forever for me to press the outer races down to where they should be. but once that was done, i slipped the packed bearings into place, slip the rotor on and then couldn't figure out how far to push the rotor on. it kept wanting to slide all the way to back on the spindle but that totally interferes with the caliper bracket. the directions just say to slide it on, then put on the thrust washer and screw on the clamp nut. then check for end play. but no idea on how far to go. so i've emailed the people i got the kit from in hopes that they can help.

after that debacle, i still had daylight so i decided to do some small stuff. i bought some speed bleeder's to put in the calipers and rear drums, so i thought i'd put those in. too bad the ones i got don't fit in the caliper! argh! i bought all this stuff from the same place assuming that they would fit. that's what you get for assuming.

next, i thought i'd try and start tearing down the rear brakes. pulled out the cotter pins, broke the lugs and then went to work on the 36mm castellated nut. i was using a 1/2" breaker bar and a 3' section of pipe. i ended up bending the pipe and getting nowhere. i liberally soaked the nuts a few different times but to no avail.

at this point i was ready to break something, so i just cleaned up and went inside. what a horrible night! i won't have time to work on it tonight, so hopefully by friday i'll have figured out the rotor problem and get these things done. i was hoping to have all my work done by monday but i don't think that is going to happen. sigh... the joys of working on a car.

Wednesday, August 23, 2006

i really hate brake lines

i got another 3 hours or so of work in last night. overall it was good but i did have one setback. i'll get to that later.

first off, i got the driver's side backing plate off pretty easily. i had to take off the bleeder valve in order to take off the brake line. it was just stuck to the spindle with years worth of crud and a little rust. once i got it off i detached the rubber brake line from the main line and put on the new stainless steel line. however, i couldn't get the rubber hose separated from the tiny hard line that goes from the rubber hose to the backing plate (soon it'll go to the caliper). i used a ton of liquid wrench and just beat on it. it wouldn't even budge when i used vice grips! needless to say, i pretty much rounded the bolt on the one side. so i need to call up the local VW parts place and see if they sell that little hard line.

the good news is that i got the caliper mounting bracket all hooked up and once i pack the bearings tonight, i can put on the disc and mount the caliper.

next, i switched over to the passenger side and ripped it all down. took me about 5 minutes! shows what you can do the second time around. had a little trouble getting the rubber hose off of the main line but my vice grips worked like a charm and i didn't harm the main line. i cleaned off the spindle, put on the caliper mounting bracket and this side is also set for bearings, disc and caliper. hopefully i can get all the done tonight and be mostly done with the discs.

i love how my directions said it would take 3 hours to do the whole thing. i've spent close to double that. i guess they mean it'll take 3 hours if you don't have rusty bolts or any other problems and you've done this before. below are more pictures i snapped last night.


here's a shot of the driver's side all stripped down to the spindle.


this is what the driver's side looks like now. the caliper bracket is in place and so is the stainless steel line.


here's a shot of the finished passenger side. caliper bracket is on and the stainless steel line is all set.


i thought this was a funny name for a company that makes bearings. too many jokes were swirling around in my head after seeing this.

Tuesday, August 22, 2006

the first post!

here i am, finally entering the 21st century. as some of you know, i'm currently doing a bunch of work on my 1971 Super Beetle. i've had a bunch of request to post pictures and keep people up-to-date on the whole process. so i just decided to create a blog and see what all the commotion is about.

i officially started working on the bug on sunday. but i really just tinkered with the carburetor to see if i could figure out why it's not idling. i found a few leaks but the carb looks really clean. so i'll fix the leaks later and see if that helps.

last night, monday, i started ripping apart the front brakes in preparation for putting on discs and calipers. i got it all jacked up and the driver's side brakes down to the backing plate. i removed the four bolts that hold the plate in but it still didn't want to budge. it was after 8:00 by then and pretty dark. so i decided to wait until i had more light and more patience to get that off. i'm hoping that i can finish up the disc install on that wheel tonight and at least get the passenger side ripped down to the spindle. below are some photo's i snapped of the whole process.


here is the 'garage.' not a bad place to work. just had to trim some of the bushes back. at least i don't have to work on it in the gravel driveway.


this is a shot of the driver's side drum. doesn't look too bad.


the glorious sight of new disc brakes. they look so much better than the drums (and hopefully they'll stop better too).


this is where i stopped last night. the lighting is weird from the flash and my work light but you get the idea. lots of brake dust in there and not much lining left on the old shoes.